

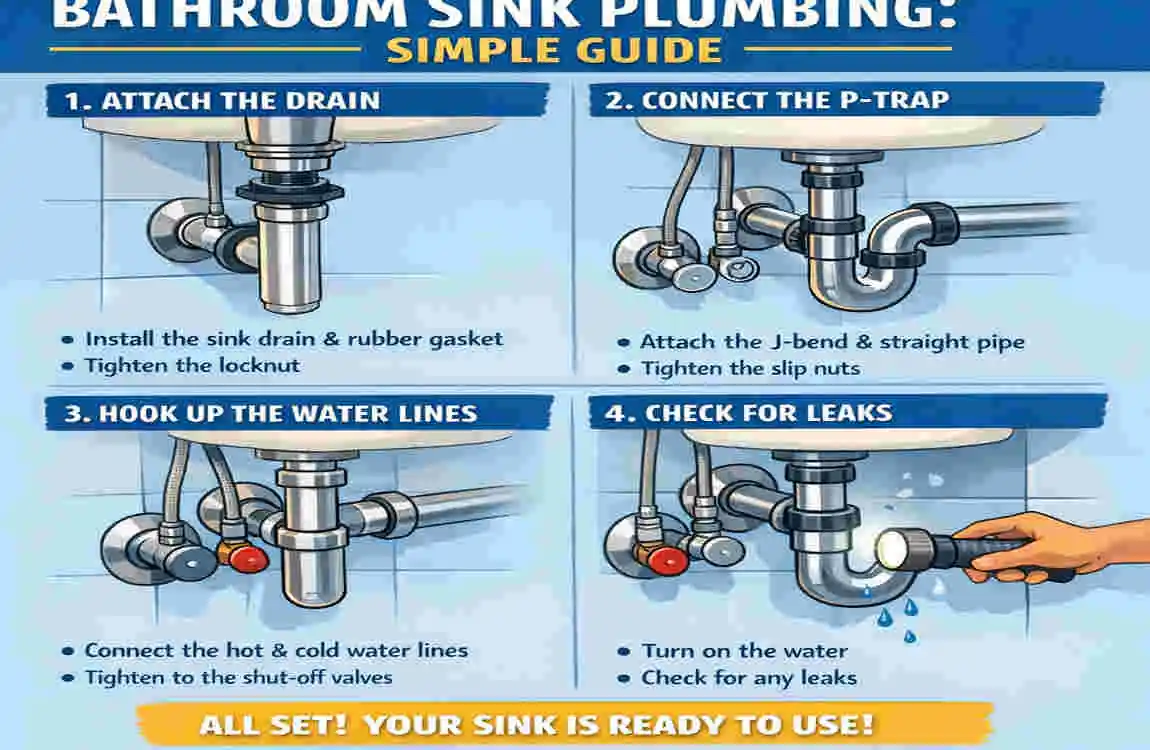
If you are trying to figure out how to plumb a bathroom sink, you are probably dealing with a new sink, a replacement project, or a leak that needs attention. The good news is that bathroom sink plumbing is very manageable when you understand the parts and follow the steps in the right order.
A bathroom sink plumbing setup is not complicated, but it does need care. You have to connect the water supply lines, the drain, and the P-trap correctly so the sink works without leaks or slow drainage. If you rush, small mistakes can turn into bigger bathroom plumbing repair problems later.
Understanding Bathroom Sink Plumbing
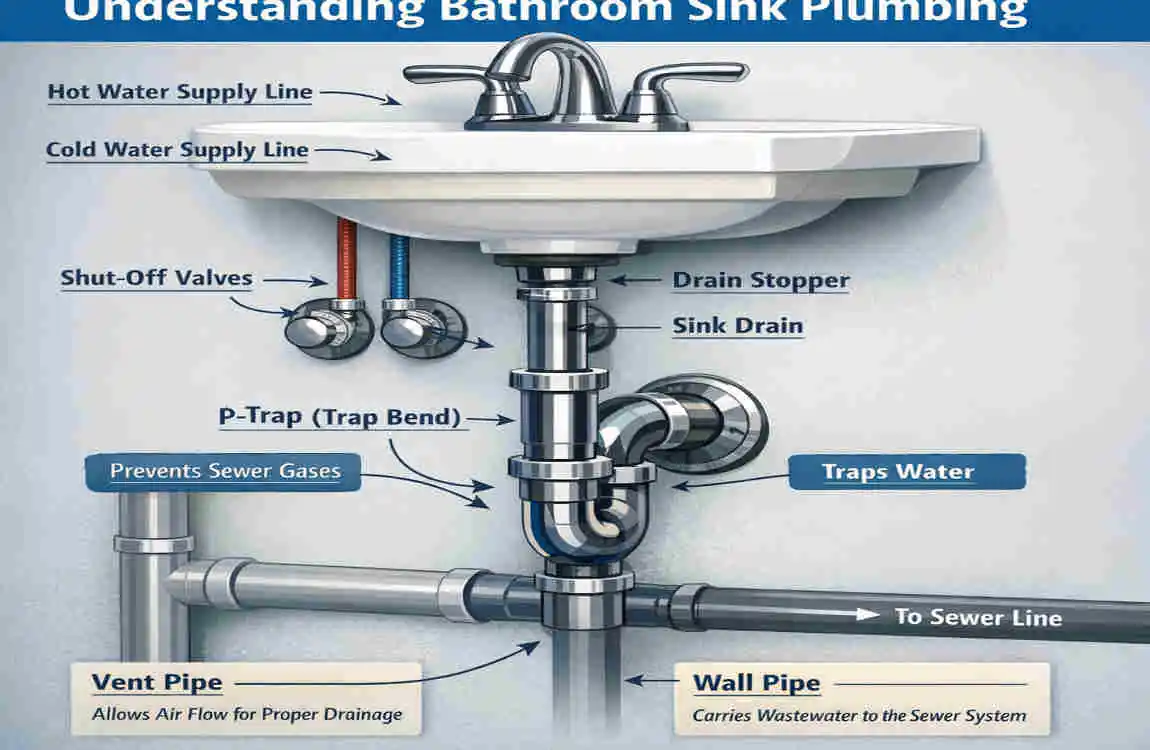
Bathroom sink plumbing includes everything that brings water into the sink and carries wastewater away. If you understand the basic parts first, the installation process becomes much easier.
What Bathroom Sink Plumbing Includes
Most bathroom sink plumbing systems have a few main parts:
- Faucet
- Sink water supply lines
- Shutoff valves
- Sink drain assembly
- P-trap
- Wall drainpipe
Each piece has a job. The faucet delivers water, the supply lines carry hot and cold water, and the drain system removes wastewater from the basin.
How the System Works
The system is simple. Water comes from the shutoff valves through the supply lines and into the faucet. After you use the sink, water goes down the drain, through the P-trap, and into the wall drainpipe.
If one part is not lined up properly, you may get leaks, poor drainage, or bad smells.
Common Bathroom Sink Plumbing Problems
Some of the most common problems are:
- Leaks under the sink
- Loose supply line fittings
- Slow drainage
- Clogged P-traps
- Dripping faucet connections
- Smells coming from the drain
Most of these problems come from loose parts, worn seals, or incorrect installation.
Tools and Materials You Need
Before you start, gather all your tools and parts. That saves time and helps you avoid stopping halfway through the job.
Essential Tools
You will usually need:
- Adjustable wrench
- Basin wrench
- Screwdriver
- Plumber’s tape
- Bucket and towels
- Safety gloves
- Eye protection
A basin wrench is especially useful because sink connections are often tight and hard to reach.
Plumbing Parts and Materials
You may also need:
- PVC or ABS drain components
- P-trap
- Flexible supply lines
- Sink drain assembly
- Plumber’s putty or sealant
- Shutoff valves if the old ones need replacement
Choosing the Correct Parts
Not all plumbing parts fit every sink. Before buying anything, check the size of the drain opening, the pipe diameter, and the type of connection under your sink.
For example, bathroom sink plumbing often uses 1 1/4-inch drain parts, but not always. Matching the parts properly matters more than buying the most expensive option.
How to Prepare for Bathroom Sink Plumbing
Preparation may not feel exciting, but it is one of the most important parts of the job. A clean and prepared workspace makes the installation easier and safer.
Turn Off the Water Supply
Before touching anything, shut off the water supply under the sink. If the valves are old or stuck, you may need to turn off the home’s main water supply instead.
After that, open the faucet to release leftover water pressure.
Remove Old Plumbing If Needed
If you are replacing an existing sink or changing the plumbing, remove the old parts carefully. Place a bucket under the trap because some water will still be inside.
Take your time with old fittings. Older plumbing can be brittle, rusty, or stuck in place.
Clean the Work Area
Wipe down the cabinet and the area under the sink. Remove dust, old sealant, or debris. A clean workspace makes it easier to spot leaks later.
It also helps you see the connections more clearly.
Check the Openings and Measure
Before you install anything, check the locations of the drain hole, wall pipe, and shutoff valve. Make sure the new parts will line up properly.
Measure the connections first so you do not end up with parts that are too short or too long.
Safety Precautions
Always work carefully when handling plumbing tools. Wear gloves if parts are dirty or sharp. Use eye protection when loosening tight fittings that may spray water.
When to Call a Professional
Some jobs are better left to a plumber, especially if:
- The pipes are badly corroded
- The shutoff valves do not work
- The wall drain is damaged
- You have hidden leaks
- You are unsure about code requirements
If the job looks more complicated than expected, professional help can save time and prevent damage.
How to Install Bathroom Sink Water Supply Lines
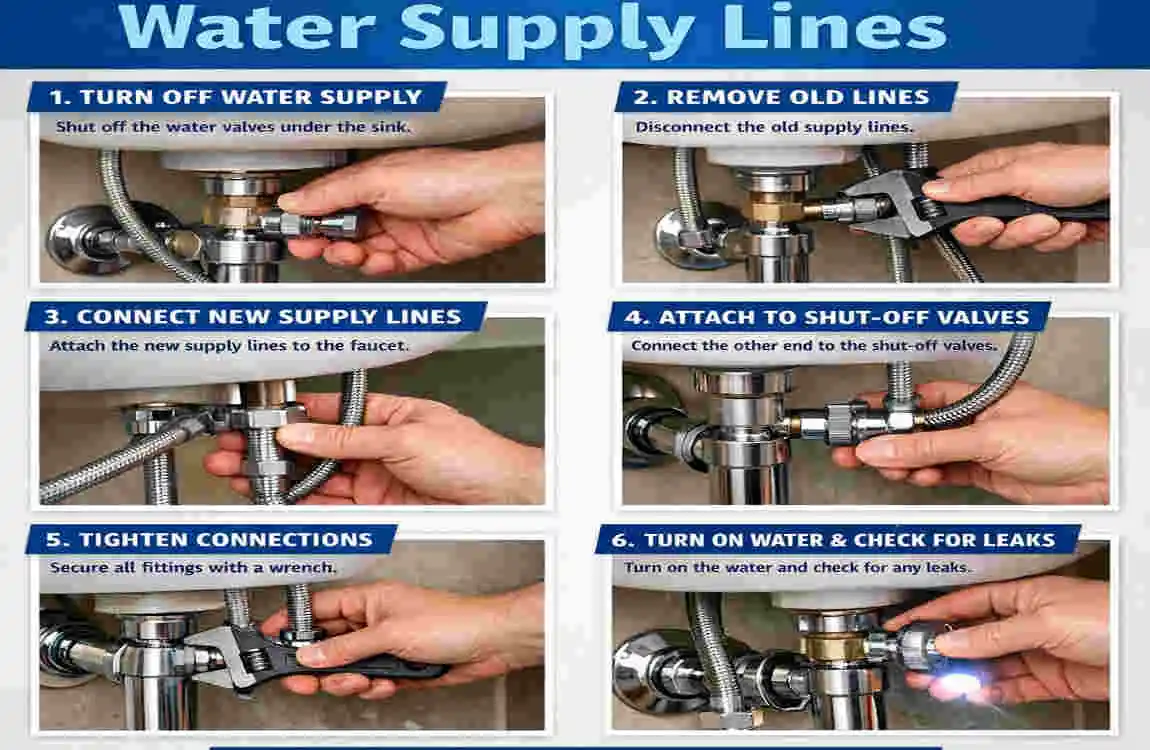
Now let’s look at the water side of the job. This part connects the faucet to the water supply in the wall.
Identify Hot and Cold Connections
First, check which shutoff valve is for hot water and which is for cold water. Usually, the hot water is on the left, and the cold water is on the right, but always verify before connecting anything.
Inspect or Install Shutoff Valves
If the old valves are working well, you can usually keep them. If they are leaking, stiff, or damaged, replace them before installing the new sink plumbing.
A good valve makes future bathroom plumbing repair much easier.
Connect the Flexible Supply Lines
Attach the supply lines to the faucet first, if the faucet design allows it. Then connect the other ends to the shutoff valves.
Make sure the fittings are lined up straight. If you force them sideways, you can damage the threads or the washer.
Tighten Without Overtightening
Use a wrench to tighten the fittings, but do not overdo it. Many leaks happen because someone cranked the fitting too hard and damaged the seal.
Hand-tight plus a small extra turn is often enough, depending on the part.
Check for Leaks
Once the connections are tight, slowly turn on the water and inspect both ends of the supply line. Watch closely for drips.
If you see moisture, turn the water off and recheck the connection before moving on.
Tips to Prevent Damaged Fittings
Keep these points in mind:
- Do not cross-thread the nut
- Do not bend the line sharply
- Do not overtighten
- Use matching parts
- Replace worn washers if needed
Small care steps now can prevent future leaks.
How to Install Bathroom Sink Drain and P-Trap
The drain side of the job is just as important as the water supply side. This is where wastewater leaves the sink and enters the home’s drain system.
Install the Sink Drain Assembly
The drain assembly fits into the sink opening. Usually, plumber‘s putty or the correct sealant is used around the drain flange, depending on the sink and drain type.
Tighten the drain assembly firmly so it seals well against the sink.
Connect the Drain Tailpiece
The tailpiece is the straight pipe below the drain. It connects the sink drain to the P-trap.
Make sure it points straight down and lines up with the trap below.
Position the P-Trap
The bathroom sink P-trap should sit in a curved shape below the drain. It should not be twisted, forced, or installed at a strange angle.
The trap needs to line up with both the tailpiece above and the wall drainpipe behind it.
Connect to the Wall Drainpipe
The trap arm connects to the wall pipe. This connection should be properly aligned so that water can flow out smoothly.
If the pipe angles are wrong, you may need to adjust the tailpiece length or the trap position.
Tighten Slip-Joint Connections
Most bathroom sink drain parts use slip-joint nuts. These should be hand-tightened first, then gently secured with a wrench if needed.
Do not over-tighten these joints. They need to be sealed, but they also need to remain serviceable for future cleaning or repair.
Common P-Trap Installation Mistakes
Some common mistakes include:
- Trap installed backward
- Pipes not aligned
- Wrong trap size
- Overtightened joints
- Missing washers
- Trap arm too long or too short
These issues can cause leaks or poor drainage.
Test the Drain
After installation, run water into the sink and check every joint under the cabinet. Look for slow drainage, drips, or gurgling sounds.
If the sink drains smoothly and no leaks occur, the drain is likely installed correctly.
Common Bathroom Sink Plumbing Mistakes to Avoid
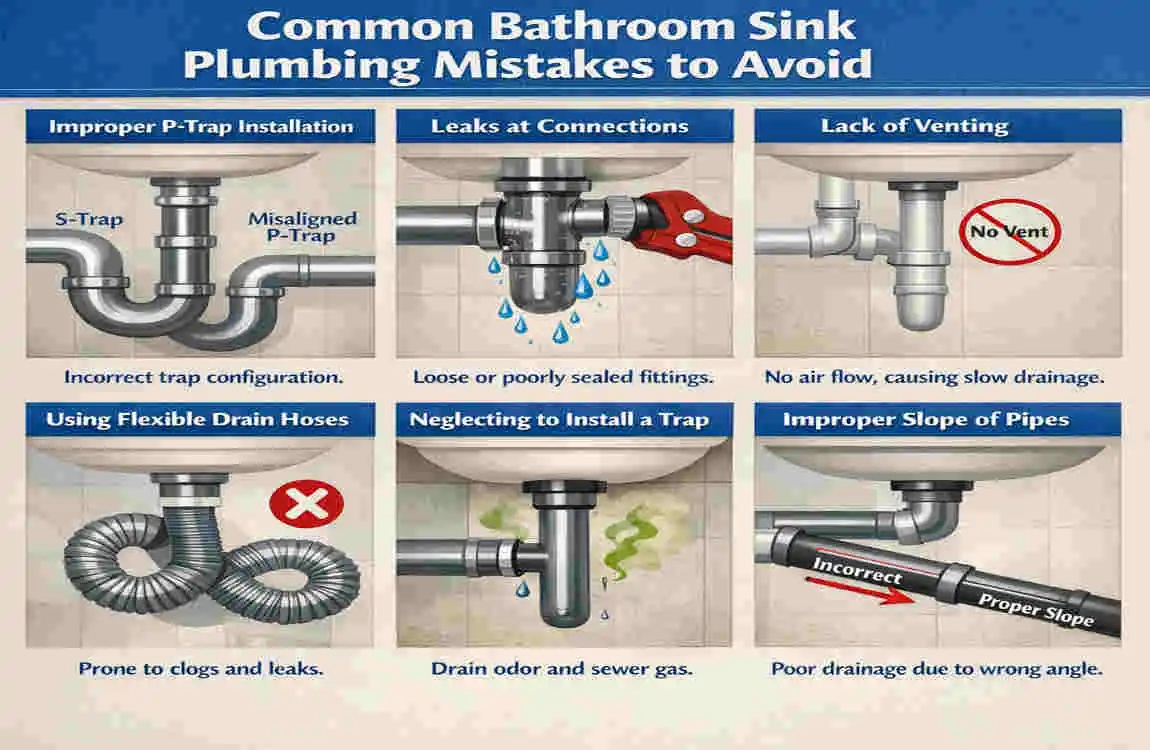
Many plumbing problems come from simple mistakes. If you know the common ones, you can avoid a lot of trouble.
Forgetting to Turn Off the Water
This sounds basic, but it happens more often than you might think. Always shut off the water before loosening any pipe.
Using the Wrong Pipe Size
Bathroom sink plumbing parts must match. If the drain or supply line is the wrong size, the connection may fail or leak.
Overtightening Connections
Too much force can damage washers, crack fittings, or strip threads. Tight is good. Crushed is not.
Incorrect P-Trap Positioning
The P-trap must sit in the right place and shape. If it is too high, too low, or crooked, the sink may drain badly.
Poor Drain Alignment
If the drain tailpiece and wall pipe do not align, the trap will be under stress. That can lead to leaks later.
Skipping the Sealant or Wrong Sealing Method
Some parts need plumber’s putty. Others need gaskets or sealant. Use the correct method for your specific drain assembly.
Ignoring Small Leaks
A tiny drip under the sink can become a bigger problem over time. Check all fittings carefully during and after testing.
Skipping the Final Water Test
Never finish a plumbing job without running water through both hot and cold sides and checking the drain.
Knowing When to Stop DIY
If you run into damaged piping, hidden leaks, or unclear drain configurations, it may be better to call a plumber instead of guessing.
Bathroom Sink Plumbing FAQs
Here are some quick answers to common questions about installing bathroom sink plumbing and related steps.
How do you plumb a bathroom sink?
You connect the faucet to the sink water supply lines, connect the drain assembly to the sink, install the P-trap, and then connect everything to the wall drain and shutoff valves.
What pipes are needed for bathroom sink plumbing?
Most setups need flexible supply lines, a drain tailpiece, a P-trap, and the correct connectors or adapters for the wall drain.
How do you connect a bathroom sink drain?
Install the drain assembly into the sink, attach the tailpiece, then connect the P-trap and wall drainpipe with properly aligned slip-joint fittings.
Does a bathroom sink need a P-trap?
Yes. The P-trap helps block sewer gases from returning to the bathroom and also catches small debris.
How do you stop a bathroom sink connection from leaking?
Use the correct part sizes, align the fittings properly, avoid overtightening, and test every connection after installation.
How long does bathroom sink plumbing installation take?
A simple sink setup may take a few hours. More complicated work can take longer, especially if old plumbing must be removed or replaced.
Can you install bathroom sink plumbing yourself?
Yes, many homeowners can do it themselves if the project is simple and the parts are standard. Good preparation matters a lot.
When should you call a professional plumber?
Call a plumber if the pipes are damaged, the drain layout is unusual, or you cannot stop a leak after checking the fittings.
| Plumbing Task | Quick Tip | |
|---|---|---|
| Turn off water supply | Close the hot and cold shut-off valves. | |
| Install the faucet | Secure the faucet to the sink and connect supply lines. | |
| Fit the drain | Install the drain flange, gasket, and drain body. | |
| Connect the P-trap | Attach the trap between the sink drain and wall drainpipe. | |
| Connect water lines | Attach hot and cold supply lines to the faucet. |
