
If you have ever dealt with leaky wooden fascia, peeling paint, or soft wood around your roof edge, you already know how frustrating exterior damage can be. Many homeowners start searching for how to add a metal frame fascia board to their house after they notice rot, sagging gutters, or water stains near the eaves. The good news is that this upgrade is practical, durable, and very achievable for a careful DIYer.
A fascia board sits along the edge of your roof, right where the roofline meets the outside wall. It does more than make your home look finished. It supports the lower edge of the roof, helps hold gutters in place, and protects the roof structure from rain, humidity, insects, and long-term moisture damage. When that area fails, bigger problems can follow.
That is why more homeowners in 2026 are moving toward metal home upgrades, especially for trim, flashing, and fascia. Metal fascia stands out for its low maintenance, weather resistance, and long-lasting durability. Unlike wood, it does not rot. Unlike some plastic products, it holds up better under heat, heavy rain, and changing weather. It also gives your home a cleaner, sharper roofline.
What Is Metal Frame Fascia Board?
Before you install anything, it helps to understand what you are working with.
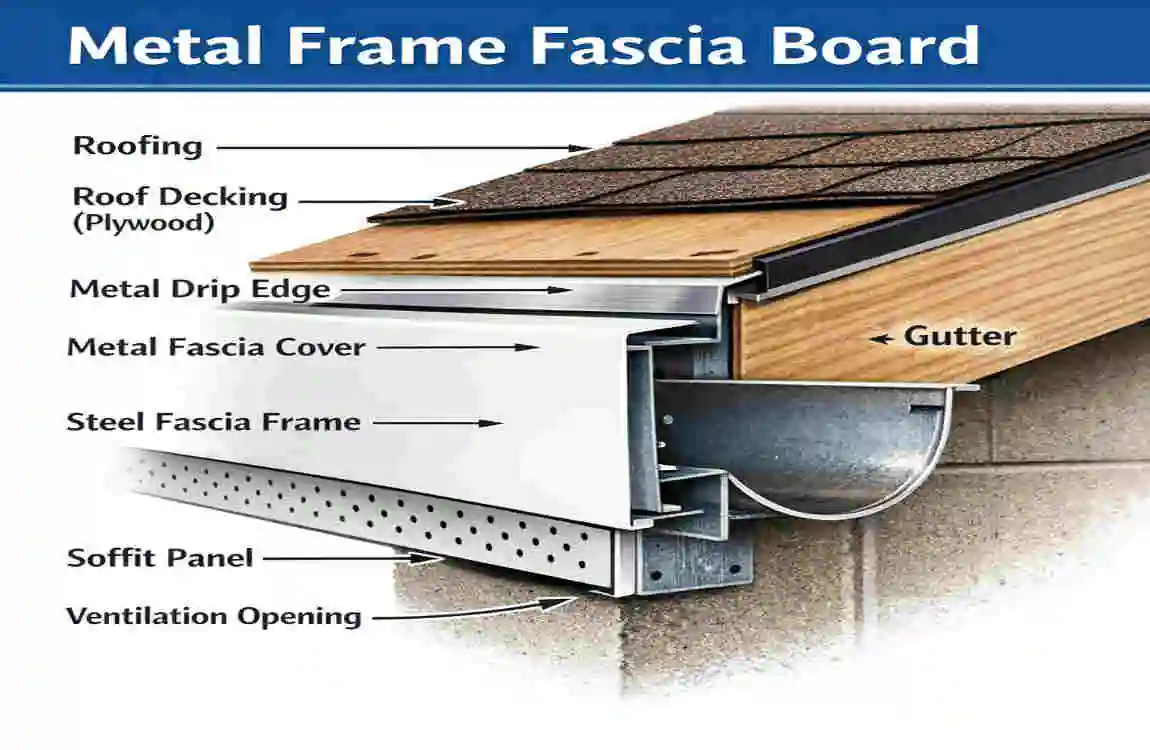
A metal frame fascia board is a protective fascia system made from metal, usually aluminium or steel, that covers or replaces the fascia at the roof edge. In many homes, the fascia also works with the soffit, drip edge, and gutters to keep water moving away from the structure.
At its simplest, the system includes a metal-facing board or cap that runs along the eaves of the house. In some setups, it fits over existing wood. In others, it attaches to a structural framing edge or a new backing board. Some designs also include channels or trim profiles that help support soffit panels and gutter brackets.
There are two common types:
Seamless Metal Fascia
This style is formed in long lengths, which means fewer seams. Fewer seams usually mean a lower risk of leaks and a cleaner finished look. It is popular for modern exterior upgrades.
Sectional Metal Fascia
This style comes in pre-cut lengths and is easier for many DIY users to handle. It works well when you need flexibility around corners, roof transitions, or smaller sections of the house.
You can also choose from many finishes and colours, making it easier to match your siding, gutters, or trim.
So why does the “metal frame” part matter? Metal fascia is strong enough to support heavy gutters, especially in areas with heavy rainfall. In climates with monsoon-like downpours, humidity, or strong sun, metal holds its shape far better than wood. It resists the kind of slow damage that often starts at the roof edge.
Benefits of Adding Metal Fascia to Your House
If you are still deciding whether this upgrade is worth it, the benefits are hard to ignore.
The first big advantage is durability. A properly installed metal fascia system can last decades, often 40 to 50 years or more, depending on the material, coating, and climate. Wood fascia, by comparison, may begin to crack, swell, or rot much sooner if it is exposed to repeated moisture.
Another major benefit is protection. Your roof edge is one of the most exposed parts of the house. Rainwater, wind-driven moisture, birds, insects, and heat all hit that area constantly. Metal fascia acts like a shield. It helps keep water from soaking into the underlying structure and makes it harder for pests to get into gaps along the eaves.
There is also the visual side. Clean fascia lines make a luxury house look finished and well-kept. If your current fascia is stained, warped, or patched in places, replacing it with metal can quickly improve curb appeal. For homeowners considering resale, exterior improvements that protect the structure and enhance appearance often make the home feel more valuable to buyers.
Then there is the maintenance factor. Wood needs scraping, repainting, sealing, and regular inspection for soft spots. Metal usually needs a rinse, a quick check at the joints, and occasional touch-up work if the finish gets scratched.
The cost can also be attractive for DIYers. While professional installation can get expensive, doing it yourself can bring the project into a much more manageable range. Many homeowners find that DIY metal fascia installation saves money in both labour and future repairs.
There is also an environmental benefit. Many metal fascia products, especially aluminium, are recyclable. That means less waste compared with materials that need frequent replacement.
Wood vs Metal Fascia Comparison
FeatureWood FasciaMetal Fascia
Average Lifespan 10–20 years 40–50+ years
Moisture Resistance Low to moderate High
Rot Risk High Very low
Pest Resistance can attract insects. Better protection
Maintenance: Frequent painting and repairs. Low maintenance
Gutter Support can weaken over time. Stronger support
DIY Cost Range: Moderate, but more upkeep. Efficient long-term value
Appearance Over Time: Can crack and peel. Stays cleaner and sharper
Eco Value Depends on sourcing , often recyclable
If your goal is roof edge protection, fewer repairs, and a stronger gutter line, metal is often the smarter long-term choice.
Tools and Materials Needed
Before you start learning how to add a metal fascia board to a house, gather everything you need. That will save you time, cut down mistakes, and make the project much safer.
Basic Tools and Materials
- Extension ladder or scaffolding
- Work gloves and safety goggles
- Tape measure
- Level
- Chalk line
- Drill or impact driver
- Tin snips or metal cutting shears
- Circular saw with a metal-cutting blade if needed
- Pry bar
- Hammer
- Caulk gun
- Exterior-grade sealant
- Metal fascia panels or fascia cap
- F-channel or trim channel if your system needs it
- Underlayment or flashing membrane
- Corrosion-resistant screws
- Touch-up paint for cut edges if recommended by the manufacturer
- Gutter brackets or gutter hardware if reinstalling gutters
For sizing, measure the total linear feet of your roof eaves. If your roofline includes corners, returns, or angled sections, add extra material for cuts and waste. A good rule is to add 10% extra, so you are not short during installation.
For an average house, a DIY budget may range from $200 to $500, though larger homes or higher-grade finishes can push the budget higher. If you are also replacing gutters, soffits, or backing boards, your cost will rise.
One more note: use manufacturer-matched screws and trim accessories whenever possible. Mixing metals can sometimes lead to corrosion over time, especially in humid or coastal conditions.
Preparation Steps Before Installation
Good results depend on good preparation. This is the part many DIYers rush, and that is often where future problems begin.
Start by inspecting the existing fascia and roof edge closely. If you see rot, mould, loose fasteners, cracks, or sagging sections, do not just cover them and hope for the best. Metal fascia is durable, but it still needs a solid base. Replace damaged wood backing or framing before you install the new metal.
If gutters are attached to the old fascia, remove them carefully. Set downspouts and brackets aside if you plan to reuse them. This is also a perfect time to clean out debris, old sealant, and dirt that may be hiding behind the gutter line.
Next, measure every section carefully. Do not assume that one side of the house matches the other. Older homes often have slight differences in roof overhangs, corner angles, or wall alignment. Measure twice and write each section down clearly.
Weather matters too. Choose a dry day with low wind. Wet roofing edges, slick ladders, and metal panels are a bad mix. In hot, humid places, try to work early in the morning so the metal is easier to handle, and the sealant cures more evenly.
If you live in a city or region with building rules, take a moment to check local requirements. In some areas, especially where exterior drainage systems affect neighbouring properties, local councils may require compliance with roofing or drainage standards. For homeowners in Pakistan, permit rules can vary by area, so a quick check with your local authority is a smart move before you begin.
Finally, organise your cutting area and installation sequence. Lay out the panels in order, mark corners, and decide where seams will fall. Planning the flow before climbing the ladder can save a lot of back-and-forth work later.
Step-by-Step Installation Guide
This is the core of the project. If you are serious about learning how to add a metal frame fascia board to a house, follow these steps carefully and take your time. A clean, level install will look better and protect your home much longer.
Remove Old Fascia
Begin by removing the old fascia material. If you are removing painted wood fascia, start at one end with a pry bar and work slowly to avoid damaging the roof edge, soffit, or siding.
Loosen any nails or screws holding the board in place. If the old fascia supports gutters, those need to come off first. Label gutter sections if needed to make reinstallation easier later.
As you remove the fascia, inspect the rafter tails or backing board underneath. This step is important. If you find soft wood, dark staining, or crumbling edges, stop and repair that section before moving on. Metal fascia should never cover structural decay.
You may also find old caulk, flashing scraps, insect nests, or trapped debris behind the board. Clean all of it out. A clean surface helps the new components fit tightly and reduces the chance of moisture being trapped inside.
If your home already has aluminium trim installed over wood fascia, check whether it is a cosmetic wrap or a full fascia system. In some cases, you may only need to remove the outer cap. In others, you may need to strip the whole edge down to sound framing.
Work in manageable sections and keep the ladder stable. If you are working on a second-story roofline, consider scaffolding or hiring a professional. Safety always comes first.
install F-Channel and Underlayment
Once the roof edge is clean and repaired, it is time to create a secure base for the new metal fascia system.
If your installation design uses F-channel, attach it according to the product instructions. F-channels are commonly used where soffit panels meet the fascia. It gives the edge a neat line and helps lock adjoining trim into place.
Before attaching the metal fascia, install a strip of underlayment or flashing membrane where water could enter behind the fascia. This extra barrier helps protect the wood framing and roof edge if wind-driven rain gets past the metal surface.
Cut the underlayment to the proper width and press it firmly in place. Make sure it lies flat, with no bubbles or folds. Overlap sections slightly so water sheds in the correct direction.
Then attach the F-channel or support trim with corrosion-resistant fasteners. Use your level often. If the support line is off, the fascia above it will be off as well. That unevenness becomes very noticeable when gutters go back on.
Do not rush this stage. The frame underneath controls the strength, straightness, and finish of the whole project.
Cut and Fit Metal Frame Fascia
Now you are ready to shape the metal fascia to your roofline.
Measure each run carefully and transfer the dimensions to the metal panel. Mark cut lines clearly with a pencil or non-permanent marker. For straight cuts, use tin snips or a sheet-metal saw. Wear gloves because the cut edges can be sharp.
If your house has outside corners, inside corners, or gable transitions, you may need mitre cuts. These angled cuts help the fascia pieces fit neatly together. A clean corner makes a big difference in the final appearance, so take your time here.
Dry-fit each piece before fastening it. Hold it in place and check for gaps, bowing, or alignment issues. The fascia should sit snugly against the edge without forcing it. If you have to push hard to make it fit, recheck your measurements.
Leave a small allowance for thermal movement if the manufacturer recommends it. Metal expands and contracts with temperature changes, and over-tight installation can lead to warping or noise later.
If your metal has a factory finish, avoid scratching the face. Place it on a soft surface during cutting and handling. Some installers also touch up exposed cut edges with matching protective paint, especially on steel products, to reduce the chance of corrosion.
At this point, your project begins to look real. Once the first few sections are cut and fitted correctly, the rest of the installation usually moves much faster.
Attach to House Rafters
With the panels cut and fitted, you can now secure the fascia to the roof edge.
Position the metal fascia so it aligns evenly with the roofline and any installed channels. Start at one end and attach it to the rafter tails or backing board using corrosion-resistant screws. In most cases, placing screws around every 16 inches works well, though you should always follow the product guidance if it differs.
Use a level constantly. Long fascia runs can appear straight at first, but drift slightly as you move along. A small error at the beginning can become very obvious by the end of the wall.
Drive screws firmly, but do not over-tighten them. This is one of the most common mistakes in metal frame fascia installation. If the fastener pulls too hard, the metal can dimple, warp, or buckle. You want the panel secure, not crushed.
Where two fascia sections meet, overlap, or join, do so in accordance with the system design. Keep seams neat and water-shedding. If the product requires seam covers or splice plates, install those now.
At corners, double-check both visual alignment and structural attachment. Corners often take more wind and more water exposure than straight runs, so they need extra care.
If you are covering existing fascia with a metal wrap rather than replacing the full board, make sure the metal cap grips tightly around the bottom and face without leaving open gaps. The goal is to protect the wood completely, not partially.
Step back often and look at the line from the ground. A level roof edge should look smooth and consistent. Catching a crooked section now is much easier than fixing it after the gutters are installed.
Seal and Add Gutters
Once the fascia is firmly attached, seal all joints, edges, and connection points with a quality exterior-grade sealant. Focus especially on seams, corners, and any areas where water could work behind the metal.
Apply the sealant in a neat, continuous bead. Then smooth it if needed, following the product instructions. The goal is not just appearance. Proper sealing helps prevent moisture entry, corrosion, and hidden damage inside the roof edge.
After sealing, reinstall the gutters or add new ones. This is where metal fascia really shines: it provides a stronger, more reliable edge for gutter attachment than damaged or ageing wood.
Set the gutter brackets at the correct slope so water flows toward the downspouts. If the pitch is wrong, even the best fascia system will not stop overflow problems. Test alignment before fully tightening the hardware.
Reconnect downspouts and ensure the discharge points send water away from the foundation: Fascia, gutters, and drainage work as one system. If one part fails, the others carry the burden.
When you are done, run a small amount of water through the gutter to see how it behaves. Watch the joints, the corners, and the fascia edge itself. This quick test can reveal issues before the first big rainstorm does.
Final Touches and Inspection
Finish the project by checking every section one more time.
Look for loose fasteners, unsealed seams, sharp exposed edges, and alignment problems. Touch up any scratches if your material requires it. Wipe away dirt or fingerprints from the metal’s surface to keep the finish clean and professional.
Then do one final water test. If water moves smoothly through the gutter and away from the house, your new metal fascia system is ready to protect your roofline for years to come.
Common Mistakes to Avoid
Even a solid DIY plan can go wrong if you miss the details. When people ask how to add a metal-frame fascia board to ato a house, the mistakes usually come down to rushing, measuring poorly, or skipping moisture protection.
Here are some of the most common errors and how to fix them:
- Over-tightening screws
- This can dent or warp the metal. Tighten screws until snug, not forced. If you have already created a dimple, loosen the fastener and replace the section if the damage is visible.
- Ignoring the roof pitch and gutter slope
- Fascia may look fine, but bad drainage will still cause leaks. Always set the gutter fall correctly toward the downspouts, and check it with water before finishing.
- Skipping sealant at joints
- In humid climates or during heavy rain, tiny gaps can become major entry points for water. Seal all seams, especially corners and overlaps.
- Installing over rotten wood
- Covering damaged fascia framing only hides the problem for a while. Remove soft or decayed wood, then repair the structure.
- Measuring only once
- One bad cut can waste an expensive panel. Measure each run, account for corners, and dry-fit the pieces before fastening.
These problems are avoidable. If you slow down and check your work at each stage, your result will look better and last much longer.
Maintenance for Long-Lasting Protection
One of the best things about metal fascia is how little maintenance it needs. Still, “low maintenance” does not mean “no maintenance.”
At least once a year, rinse the fascia and gutters with clean water to remove dust, pollen, and grime. This is especially useful if your home sits near traffic, trees, or coastal air.
Inspect the fascia line for dents, loose screws, open seams, or scratches. Small issues are easy to fix early, but much harder to deal with once they let in water.
Keep your gutters clean, too. Clogged gutters can overflow behind the fascia, which defeats the purpose of the upgrade. In rainy seasons or before winter, clear leaves and debris from the eaves.
If your product includes a factory coating, avoid harsh chemicals when cleaning it. A soft cloth, mild soap, and water usually do the job.
For extra longevity in hot and sunny climates, choose or maintain UV-resistant coatings. They help preserve colour and reduce finish breakdown over time.
With just a little attention each year, your metal fascia can keep protecting your house for decades.
Cost Breakdown and ROI
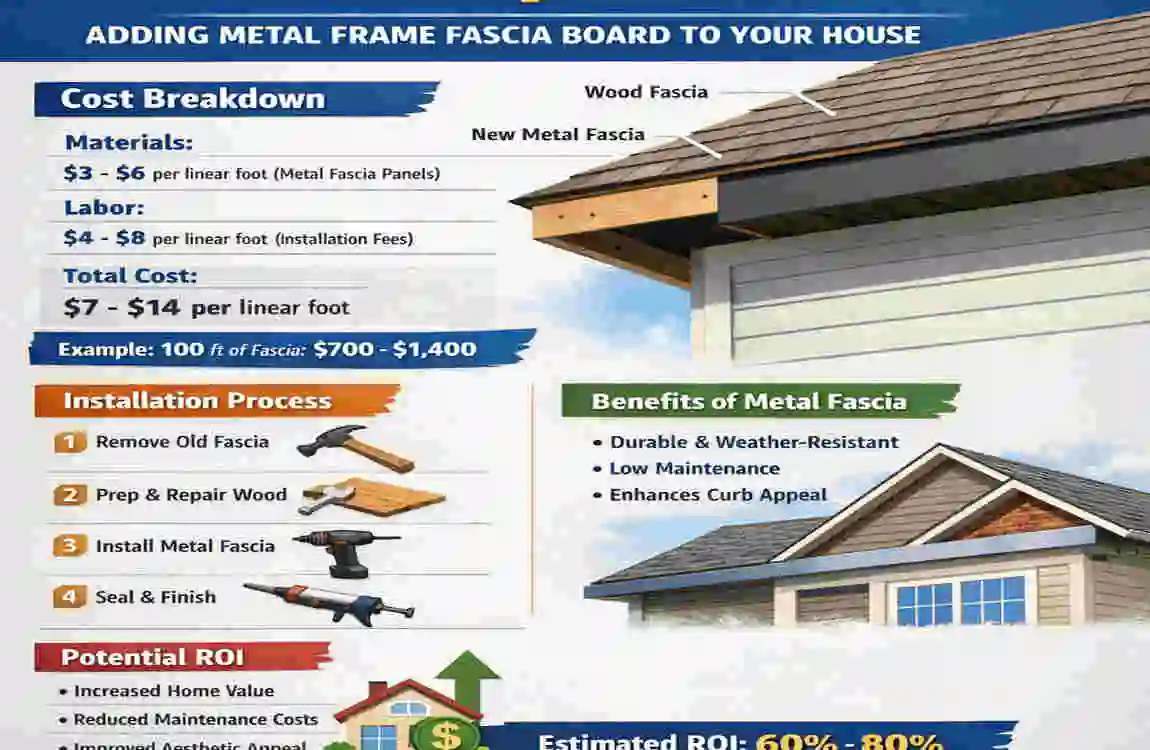
The cost of install metal fascia on house projects depends on material type, roofline complexity, and whether you are replacing gutters at the same time.
For many DIY jobs, metal fascia materials may cost $2 to $5 per linear foot. In comparison, professional installation can cost $10 or more per linear foot, depending on the region and access difficulty. An average 100-foot roofline may take a prepared DIYer 1 to 2 days.
The return on investment is not only about resale. The real value comes from preventing water damage, reducing maintenance, and extending the life of the roof edge and gutter system. When you avoid future repairs to rotten wood, peeling paint, and loose gutters, the upgrade starts paying you back over time.
FAQs
Can beginners do this on a two-story house?
Yes, but only if they are comfortable working at height and use proper ladder or scaffold safety. For a two-story home, the install itself may still be beginner-friendly, but the height makes the project more serious. If access feels risky, hire help for the upper sections.
Metal vs vinyl fascia: which is better?
For strength and long-term durability, metal usually wins. Vinyl can be lightweight and affordable, but it is generally less rigid. It may not support demanding gutter conditions as well as aluminium or steel fascia.
How long does installation take?
For a simple one-story home, installation can often take around 4 to 8 hours for smaller sections, or 1 to 2 days for a full 100-foot roofline if you are removing old material and reinstalling gutters.
What is the best metal for Pakistani houses?
In many cases, galvanised or coated aluminium is a strong choice because it balances rust resistance, light weight, and durability. In humid or rainy areas, choosing a high-quality finish and properly sealing joints matters as much as the base metal.