
When it comes to home plumbing, venting is a crucial aspect that often goes unnoticed until it becomes a problem. It ensures that your plumbing system functions efficiently, prevents unpleasant odors, and maintains proper air pressure in the pipes. Traditionally, plumbing systems are vented through the roof, but can you vent home plumbing through a wall? The short answer is yes—if done correctly and in adherence to building codes.
Understanding Plumbing Venting Basics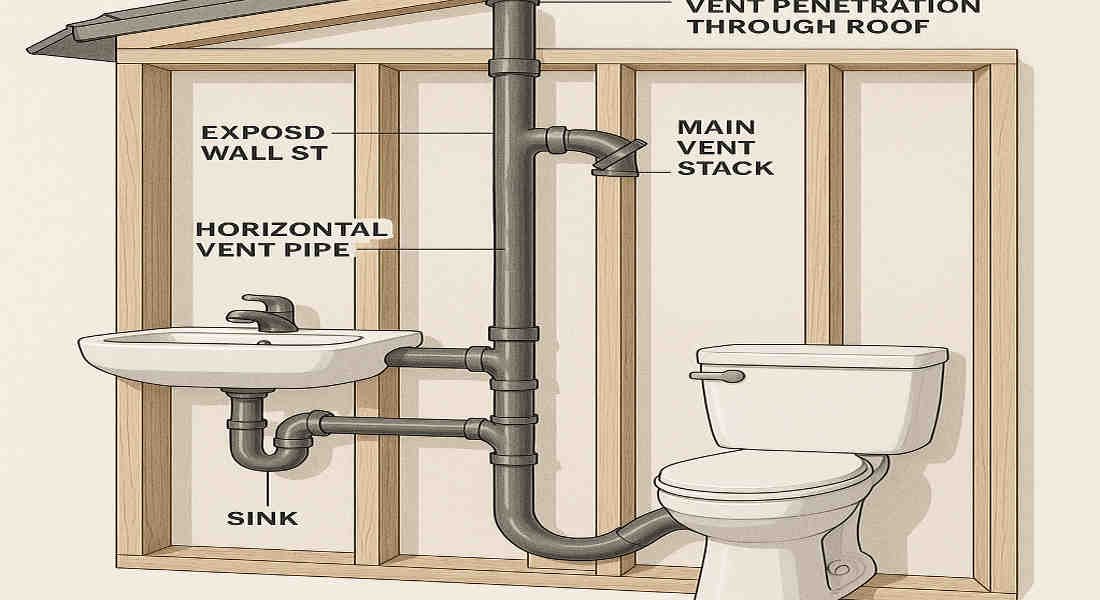
Before diving into wall venting, it’s essential to understand what plumbing venting is and why it’s so important.
What Is Plumbing Venting?
Plumbing venting refers to the system of pipes that allows air to flow into and out of your plumbing system. These vents prevent vacuum pressure from forming in the pipes when water flows through, ensuring that wastewater drains properly. Additionally, vents provide a safe pathway for sewer gases to escape into the atmosphere, thereby protecting indoor air quality.
Why Is Venting Necessary?
Without proper venting, your plumbing system could experience a range of issues, including:
- Slow drainage: A lack of air pressure balance can cause water to drain slowly.
- Backups: Improper venting can lead to clogs and wastewater backups.
- Unpleasant odors: Sewer gases may leak into your home if they cannot escape through vents.
Traditional Roof Venting
In most homes, plumbing systems are vented through the roof. This involves running vent pipes vertically through the walls and exiting above the roofline. Roof venting is adequate, but it comes with drawbacks, such as the risk of roof leaks and the complexity of the installation process.
Introduction to Wall Venting
Wall venting offers an alternative to roof venting, especially in situations where roof access is difficult or architectural constraints make roof venting impractical. By venting through an exterior wall, homeowners can avoid roof penetrations while maintaining proper system functionality.
Can You Vent Home Plumbing Through a Wall?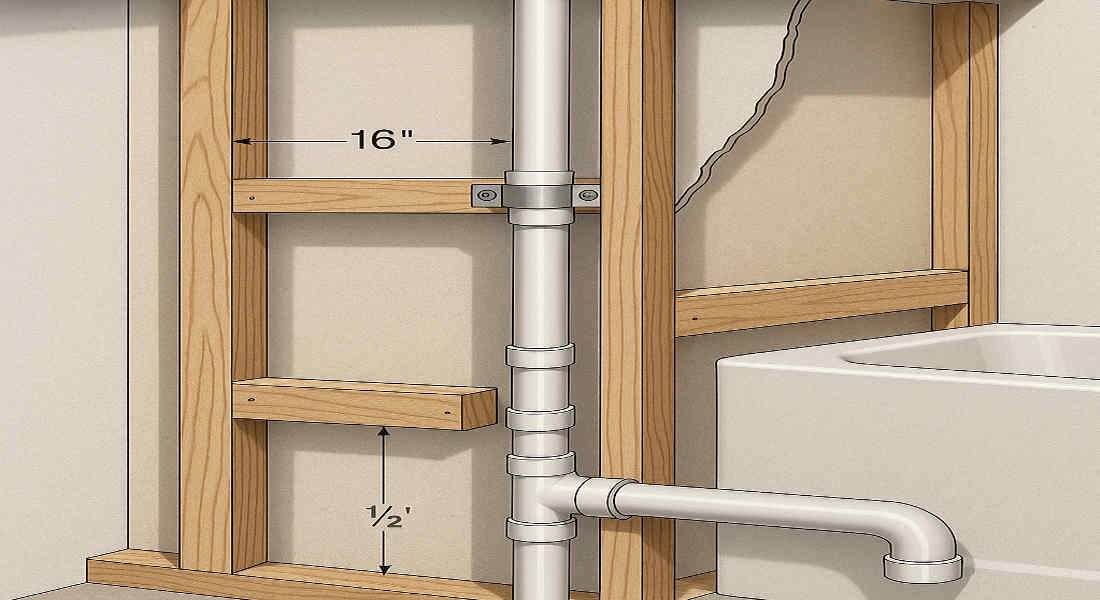
Let’s address the core question: Can you vent home plumbing through a wall?
The Short Answer
Yes, you can vent home plumbing through a wall, provided you follow proper planning and installation techniques and adhere to local building codes. Wall venting is a practical alternative in specific scenarios, offering flexibility and convenience.
When Wall Venting Is Preferred
Wall venting is typically chosen in the following situations:
- Architectural limitations: In homes with flat roofs or unique designs, roof venting may not be feasible.
- Avoiding roof penetrations: Some homeowners prefer to avoid cutting through the roof due to potential leaks or aesthetic concerns.
- Accessibility: Wall vents are easier to access for maintenance and repairs compared to roof vents.
Code Considerations
While wall venting is possible, it’s essential to check local plumbing codes and regulations. These codes dictate:
- The minimum height of the vent is above ground level.
- The distance of the vent from windows, doors, or air intakes.
- The type of materials allowed for vent pipes.
Failure to comply with these codes can result in fines, poor system performance, or health hazards.
Benefits and Drawbacks of Venting Through a Wall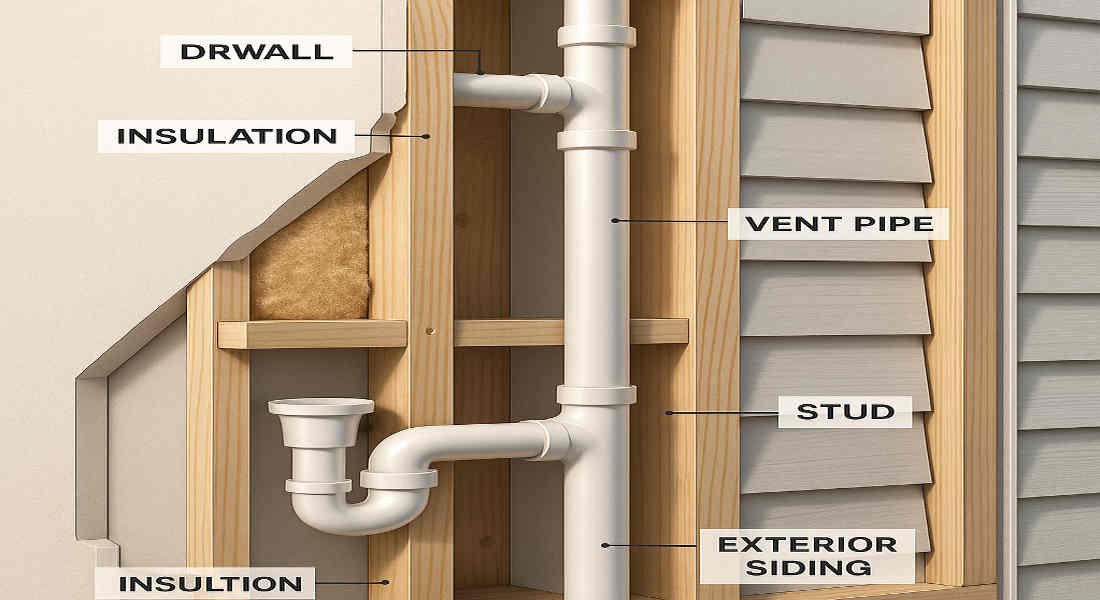
Like any home improvement solution, wall venting comes with its own set of pros and cons.
Benefits
- Easier Maintenance
- Wall vents are more accessible than roof vents, making it easier to inspect, clean, and repair them when necessary.
- Prevents Roof Penetrations
- By avoiding roof penetrations, you reduce the risk of leaks and damage to your roofing materials.
- Aesthetic Advantages
- Wall vents can be creatively concealed or styled to blend in with your home’s exterior, maintaining curb appeal.
Drawbacks
- Odor Concerns
- Wall vents may release unpleasant odors near windows, patios, or outdoor living spaces if not positioned correctly.
- Sealing Challenges
- Proper sealing is crucial to prevent air and moisture leaks, which can compromise energy efficiency and lead to mold growth.
- Code Limitations
- Some local codes may impose stricter requirements for wall venting, making the process more complex.
Planning Your Wall Vent Installation
A successful wall venting project begins with careful planning. Here’s what you need to consider:
Selecting the Right Location
Choose a spot on the exterior wall that:
- It is accessible for installation and maintenance.
- Complies with code requirements (e.g., minimum distance from windows and doors).
- It avoids high-traffic or visually prominent areas.
Determining the Wall Type
The type of wall—whether it’s wood, brick, or concrete—will influence the tools and techniques needed for installation.
Choosing the Right Materials
Select vent pipes made of durable materials, such as PVC or ABS, to ensure they are compatible with your plumbing system. Additionally, choose a vent cap designed to keep out debris and pests while allowing proper airflow.
Tools and Materials Needed
Here’s a list of essential tools and materials:
- Vent pipe (PVC or ABS)
- Hole saw and drill
- Pipe clamps and screws
- Caulk or expanding foam
- Vent cap
- Safety gear (gloves, goggles)
Step-by-Step Guide to Vent Home Plumbing Through a Wall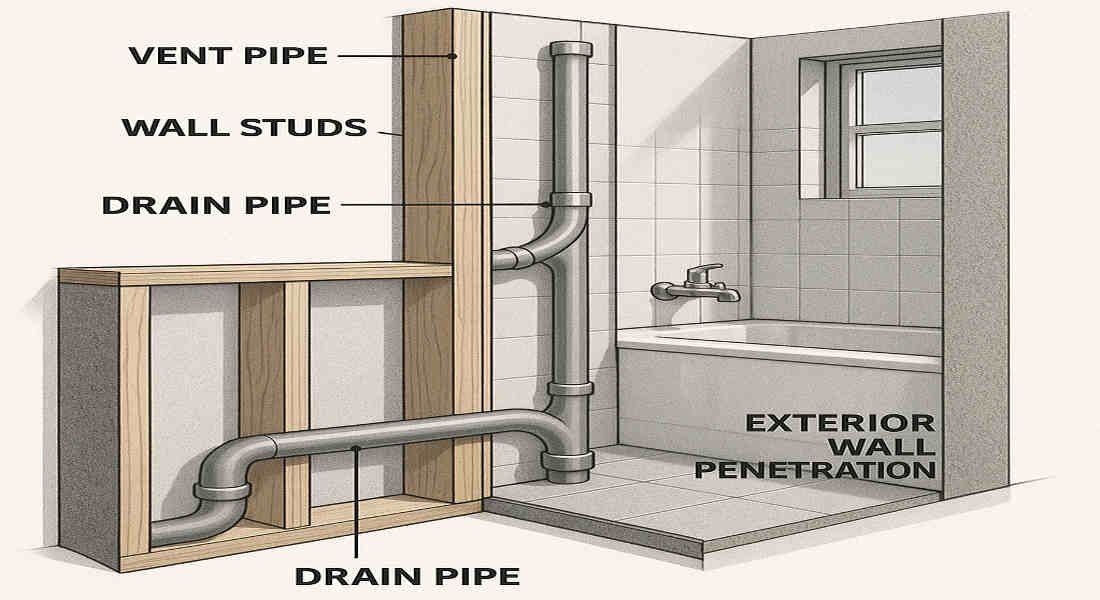
Follow these steps to install a plumbing vent through a wall effectively:
Mark the Wall
Use a level to mark the entry and exit points for the vent pipe. Ensure the pipe slopes slightly downward toward the exterior to prevent condensation from building up.
Drill the Hole
Drill a hole in the wall using a hole saw that’s slightly larger than the diameter of the vent pipe. Remove any debris and inspect the wall cavity for any obstacles.
Insert the Vent Pipe
Insert the pipe through the hole, ensuring it is flush with the interior wall surface. Secure the pipe with clamps and screws to prevent it from moving.
Seal the Hole
Apply caulk or expanding foam around the pipe to prevent air and moisture leaks. Proper sealing is crucial for energy efficiency and pest prevention.
Install the Vent Cap
Attach a vent cap to the exterior end of the pipe. The cap should be designed to keep out debris, insects, and rainwater while allowing proper airflow.
Finishing Touches
Add trim or molding around the pipe openings for a clean, finished look. Inspect the installation to ensure stability and code compliance.
Comparing Wall Venting vs. Roof Venting
Here’s a quick comparison of wall venting and roof venting:
Feature Wall Venting Roof Venting
Installation Complexity: Moderate, requiring wall penetration. It is often easier with attic access.
Maintenance Access: Easier, accessible from outside. It is harder and requires roof access.
Aesthetic Impact Can be concealed or decorative Visible on the roof
Code Restrictions Varies, sometimes stricter Generally accepted universally
Risk of Leaks Lower risk of roof leaks Roof penetrations can leak
Odor Concerns Possible near windows or patios Usually vents above the roofline
Maintenance and Best Practices
To ensure your wall vent functions efficiently:
- Inspect the vent regularly for blockages or damage.
- Clean the vent cap periodically to prevent debris from building up.
- Check for odors or drainage issues, which could indicate vent problems.
- Perform seasonal maintenance to keep the vent in good condition.
You may also read (how to handle home plumbing without a license in nyc).