
Is there anything worse than waking up on a chilly winter morning, stepping out of bed, and feeling like you just walked onto an ice rink? If you live in a mobile home, you probably know this feeling all too well. Those cold floors aren’t just uncomfortable; they are a sign that your hard-earned money is slipping right through the cracks—literally.
We have all been there. You crank up the furnace, wrap yourself in blankets, and yet, the chill seems to linger around your ankles. The culprit is almost always lurking right beneath your feet.
Why Replace Insulation Under Your Mobile Home?
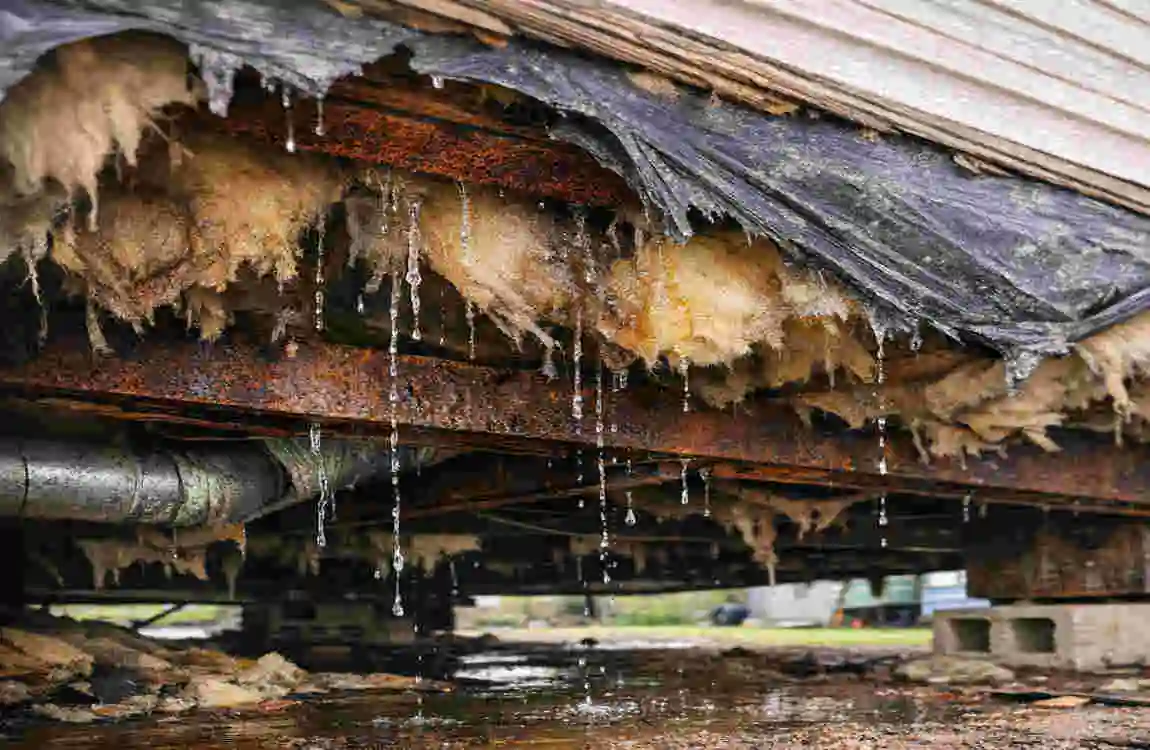
You might be asking yourself, “Is this really necessary? Can’t I buy a thicker rug?” While rugs are nice, they are just a band-aid on a much bigger problem. The insulation under your mobile home—often called the “underbelly”—has a tough life. It hangs there, exposed to the elements, moisture from the ground, and the occasional critter looking for a warm nest.
Most insulation materials have a lifespan of about 10 to 15 years. If your mobile home is older than that and you haven’t checked underneath lately, there is a good chance your insulation is sagging, wet, or nonexistent.
Here is why tackling this project is so urgent:
Massive Energy Efficiency
When your insulation is failing, your furnace has to work overtime. It runs longer and cycles more frequently to maintain a baseline temperature. By learning how to replace insulation under mobile home floors, you stop that heat transfer. You keep the warm air in during winter and the cool air in during summer. This directly translates to lower utility bills at the end of the month.
Health and Safety
This is a big one that people often overlook. Old insulation often acts like a sponge. If moisture gets into your underbelly (which happens often due to plumbing leaks or ground evaporation), that wet insulation becomes a breeding ground for mold and mildew.
Those mold spores don’t just stay underneath the house; they can rise through the floorboards and affect the air quality inside your home. Replacing soggy insulation is crucial for preventing respiratory issues and keeping your family healthy.
Pest Prevention
Mice, rats, and insects love fiberglass. It makes for cozy nesting material. Over time, pests can tear apart your underbelly barrier and destroy the insulation. By replacing it, you get the chance to seal up those entry points and kick the critters out for good.
Boosting Home Value
If you plan on selling your mobile home in the future, a well-insulated, intact underbelly is a major selling point. Inspectors look for this. A sagging, torn underbelly is a red flag, while a crisp, sealed one screams “well-maintained.”
Types of Insulation for Mobile Homes
Before you crawl under the house, you need to choose your weapon. Not all insulation is created equal, and mobile homes have unique requirements compared to stick-built houses. You generally need something that fits between floor joists and can withstand the unique physics of a mobile home underbelly.
Here is a breakdown of the most common options to help you decide which is best for your mobile home underbelly insulation replacement:
Best Insulation for Mobile Home Floors Comparison
TypeProsConsR-ValueCost per Sq Ft
Fiberglass Batts: Very affordable, easy for DIYers to handle, widely available at hardware stores. Absorbs moisture like a sponge, can be itchy to install, and attracts rodents. R-11 to R-19 $0.50 – $1.00
Foam Board (Rigid Polyiso): Highly moisture-resistant, excellent R-value per inch, durable. Harder to fit around pipes and wires, more expensive, and requires precise cutting. R-6 per inch $1.00 – $2.00
Spray Foam: Seals every gap perfectly, waterproofs, and adds structural rigidity. Very expensive, requires professional equipment, and is hard to remove for later repairs. R-6 per inch $1.50 – $3.00
Reflective Foil Lightweight acts as a radiant barrier against heat flow. Low R-value on its own; usually needs to be paired with other insulation. R-4 to R-8 $0.30 – $0.70
Which One Should You Pick?
For most homeowners looking to replace insulation under mobile home floors as a DIY project, Fiberglass Batts remain the industry standard. They are cost-effective and flexible enough to stuff into the weird cavities under a mobile home.
However, if you live in a very wet climate, you might consider pairing fiberglass with a Reflective Foil barrier to help manage moisture, or upgrading to Foam Board if you have a clear, unobstructed shot at the joists.
Tools and Materials Needed
Preparation is half the battle. You do not want to be stuck crawling on your back under the house, only to realize you forgot the duct tape.
Here is your shopping list to get the job done right.
Essential Safety Gear
- Disposable Coveralls: Trust me, you do not want insulation fibers or old spiderwebs on your clothes. Get the ones with a hood.
- Respirator Mask: Not just a paper mask. Get an N95 or better to protect against mold spores and dust.
- Goggles: Safety glasses that seal against your face are best to keep falling debris out of your eyes.
- Heavy-Duty Gloves: To protect your hands from sharp metal and fiberglass.
The Toolkit
- Utility Knife: With plenty of extra blades. You’ll be doing a lot of cutting.
- Staple Gun: A heavy-duty manual or electric staple gun is mandatory.
- Tape Measure: Accuracy matters.
- Headlamp: It is dark down there! A headlamp keeps your hands free.
- Rake: To clear debris from the ground before you start crawling.
Materials
- Insulation Rolls: Based on your measurements (buy 10% more than you think you need).
- Underbelly Repair Fabric: Or “bottom board” material. Do not use regular plastic sheeting; it traps moisture. You need a breathable belly wrap for your mobile home.
- Flex-Mend Tape: This special tape is designed for underbellies. Duct tape will peel off in a month.
- Spray Adhesive: Helpful for patching.
Budget Estimate: For a standard single-wide mobile home (approx. 1,000 sq ft), you are looking at roughly $300-$800 for materials, depending on the R-value you choose.
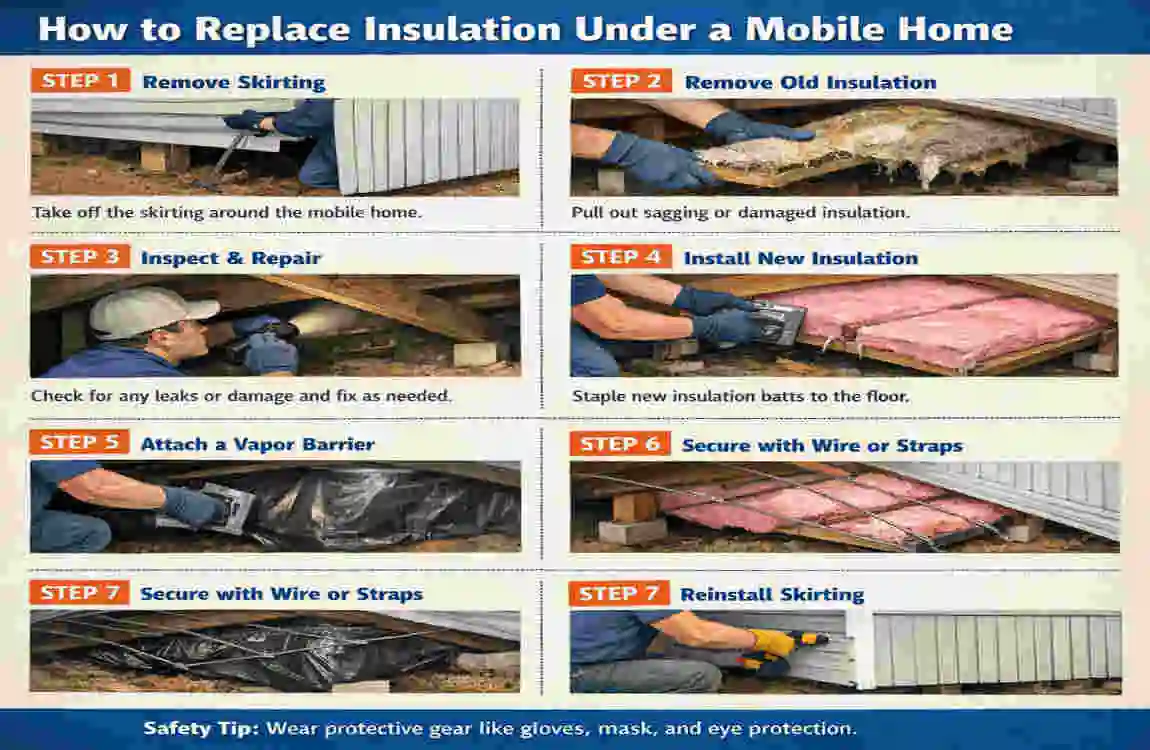
Step-by-Step Guide: How to Replace Insulation Under a Mobile Home
Alright, this is the main event. We are going to break this down into manageable chunks. Take your time and don’t rush. If you get tired, take a break. Working efficiently is better than working sloppily.
Preparation and Safety First
Before you even touch a skirt panel, you need to do a reconnaissance mission.
- Inspect the Perimeter: Walk around your home. Look for big gaps in the skirting where animals might have entered.
- Turn Off Utilities: This is critical. Locate your main water shut-off and your electrical breaker box. It is highly recommended to shut off the power to any circuits that run through the floor. You don’t want to slice a live wire with your utility knife accidentally.
- Check the Weather: You need a dry window. Do not attempt this if it has just rained and the ground is muddy. Ideally, wait for a dry spell where temperatures are moderate (above 50°F is nice, so your fingers don’t freeze).
- Stabilize: Ensure the home is securely blocked and leveled. You will be crawling underneath, so safety is paramount.
Access the Underbelly
To reach the insulation, you have to get past the skirting and the vapor barrier (the black plastic-like fabric under the joists).
Start by removing the skirting panels on one side of the home. You don’t need to take them all off, just enough to give you a clear entry and exit point, plus light.
Once you are under there, look at the belly board. If it is already sagging and torn, you will likely have to cut large sections away. If it is in good shape and you are just adding insulation, you might only need to make strategic slits.
Remove Old Insulation
This is the messy part. If your insulation is wet, it will be heavy.
- Use your utility knife to cut open the belly fabric where the insulation is damaged.
- Pull down the old fiberglass. Be careful! If you see droppings, assume they are hazardous.
- Immediately bag the old insulation in heavy-duty trash bags. Do not leave it lying on the ground to be dragged through later.
- The Asbestos Check: If your mobile home was built before 1980, there is a slight chance the insulation or wrap contains asbestos. Suppose it looks like gray, rocky wool or has a paper backing that resembles cardboard, stop. You may need to call a pro to test it.
Repair the Underbelly
Before you put the new fluffy stuff in, make sure the “hammock” that holds it is secure.
If the belly board has holes, pests can get right back in.
- Small Holes: Clean the area and patch it with Flex-Mend tape.
- Large Tears: You will need to cut a piece of new bottom board fabric. Use spray adhesive to tack it in place, then staple it and thoroughly tape the seams.
- Pipe Check: While everything is open, look at your water lines. Now is the perfect time to add heat tape or pipe insulation to them while they are accessible.
install New Insulation
Now, let’s make the house warm.
- Measure and Cut: Measure the width between your floor joists. Standard spacing is usually 16 or 24 inches. Cut your insulation batts to fit snugly.
- Orientation: The paper side (vapor retarder) should generally face up toward the heated floor in cold climates. However, in mobile homes, many experts recommend using unfaced batts to prevent moisture from being trapped between the floor and the insulation. Check your local building codes.
- Placement: Push the insulation up into the cavity. It should fit tightly against the bottom of the floorboards.
- Crucial Note: Do not compress the insulation! Fiberglass works by trapping air pockets. If you squish a 6-inch batt into a 2-inch space, it loses its R-value. Let it remain fluffy.
- Securing: If the insulation falls, you can use insulation supports (wire rods) that push between the joists to hold it up while you work on the belly board.
Seal and Test
You are in the home stretch!
Once the insulation is tucked in, you need to close the belly board back up.
- Pull the underbelly fabric tight across the joists.
- Staple it securely to the bottom of the joists.
- Seal every single seam with your specialized tape. Air leaks are the enemy of efficiency.
- Reinstall Skirting: Put your siding back on, ensuring there are no gaps for rodents.
The Test: over the next few days, pay attention to your floor. Does it feel warmer? Monitor your heating system. It should be cycling less often.
Common Mistakes to Avoid When Replacing Mobile Home Insulation
Even handy homeowners can trip up on this project. Here are the pitfalls to watch out for to ensure your DIY mobile home insulation project is a success.
- Skipping the Vapor Barrier: Never leave the insulation exposed to the ground. The ground releases moisture constantly. Without a sealed belly board, your new insulation will be a soggy mess in six months.
- Ignoring the Plumbing: If you insulate over a leaking pipe, you are trapping water against your wooden floor joists. That is a recipe for rot. Always fix leaks first.
- Using the Wrong R-Value: Don’t just buy the thickest roll you find. If you buy R-30 insulation (which is very thick) and try to jam it into a shallow floor joist system, you will compress it, reducing its effectiveness. Use the Department of Energy (DOE) zone calculator to find the recommended R-value for your region (usually R-11 to R-22 for floors).
- Poor Sealing: If you use duct tape instead of proper underbelly tape, it will fail. The adhesive on duct tape dries out and falls off with temperature changes.
Cost Breakdown and Savings Calculator
Is it worth the effort? Let’s look at the numbers. Replacing insulation is an investment, but the payback period is surprisingly short.
Estimated Costs
ItemDIY Cost (Approx.)Pro Cost (Approx.)
Materials (Insulation, Barrier, Tape) $400 $600 (Markup)
Tools (Stapler, Suit, Knife) $100 $0 (Included)
Labor $0 (Your sweat equity!) $1,000 – $2,000+
Total Project Cost $500 $1,600+
The ROI: If your heating bill averages $200 a month in winter, and you save 25% by insulating, that is $50 a month in your pocket. Over a 4-month winter, that is $200. You could pay off your DIY material costs in just two winters. Plus, you are adding value to the home itself.
When to Call a Professional
I am a huge fan of DIY, but there are times when you need to wave the white flag. You should search for “mobile home insulation contractors near me” if:
- Extensive Water Damage: If you find that the floor joists are rotting or sagging significantly, this is a structural issue, not just an insulation issue.
- Pest Infestation: If the underbelly is swarming with rats, raccoons, or a massive termite colony, you need an exterminator and a pro to handle the biohazard cleanup.
- Asbestos: As mentioned earlier, if your home is pre-1980, do not disturb the materials until they have been tested.
- Physical Limitations: This job requires crawling, reaching, and working in tight spaces. If you have back problems or claustrophobia, it is worth paying a pro to handle it safely.
You can often find certified installers through resources like MHVillage or local mobile home supply stores.
FAQs
How long does it take to replace insulation under a mobile home?
For a DIYer working alone or with a partner, plan for one to two full weekends. It is slow work. If you are doing a small patch, you can knock it out in an afternoon.
What is the best insulation for mobile home winters?
For the best balance of cost and warmth, R-19 Fiberglass Batts paired with a solid, sealed underbelly barrier is the gold standard. If you can afford it, rigid foam board offers better moisture resistance but is harder to install.
Can I replace insulation under a mobile home myself?
Absolutely. It does not require a license or complex electrical knowledge. It mostly requires patience, the ability to crawl in small spaces, and a willingness to get a little dirty.
Should I insulate the skirting too?
Yes! Insulating the floor is step one. Step two is insulating the skirting (the perimeter). This creates a “buffer zone” of air under the house that stays warmer than the outside air, further helping your floors.